Signs of Poor Quality Drywall Installation
ultimate-guide · October 4, 2026 · Editorial Team
Table of Contents
- What Poor Quality Drywall Installation Looks Like
- Nail Pops and Fastener Issues
- Visible Seams, Cracking, and Drywall Finishing Standards
- Uneven Surfaces and Poor Sanding Quality
- How to Fix Drywall Tape Bubbles and Blistering Paint
- Water Damage, Sagging, and Structural Concerns
- Cost to Repair Bad Drywall Installation and When to Call a Professional
- Frequently Asked Questions
Last Updated: October 4, 2026
What Poor Quality Drywall Installation Looks Like
Poor quality drywall installation creates problems that compound over time. Defects often aren't visible immediately but show up in cracks, settling issues, and structural concerns that worsen with seasonal changes.
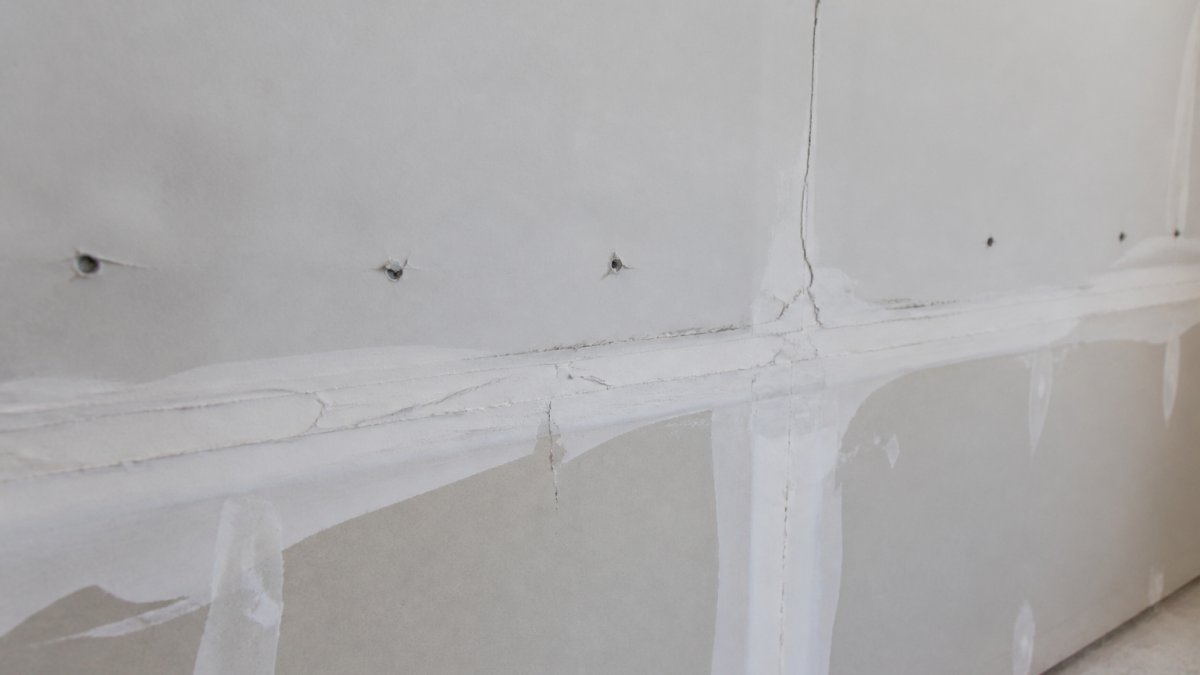 Close-up of drywall wall surface showing visible nail pops, cracked seams, and uneven joint compound application with poor finishing quality
Most homeowners don't know what to look for until problems become obvious. Understanding the signs early helps you catch problems before they spread and become expensive.
The hallmarks of poor quality drywall installation fall into several categories: fastener issues, finishing defects, structural problems, and moisture damage. Each one tells a different story about what went wrong during installation or how the wall has settled since.
Nail Pops and Fastener Issues
Nail pops are one of the most visible signs of poor quality drywall installation. They occur when fasteners push through the drywall surface, creating a visible bump that catches light.
The root cause is usually improper fastener spacing or inadequate seating. Fasteners should be spaced roughly 12 inches apart on studs, with screws seated flush without breaking the paper. Improper spacing or seating allows sheets to shift or settle, pushing fasteners outward over time.
The problem is almost always installation technique. Poor quality drywall installation leaves fasteners insufficiently driven, allowing them to back out as the frame settles. Seasonal moisture fluctuations cause wood studs to swell and contract, and loose fasteners can't resist that movement.
Using nails instead of screws is another common error. Nails have less holding power and are more prone to popping. Screws provide superior grip and are the professional standard.
Visible Seams, Cracking, and Drywall Finishing Standards
Visible seams and cracking indicate inadequate taping and mudding, the process of covering joints with joint compound and tape.
Poor quality drywall installation frequently skips steps or uses insufficient coats. Proper finishing requires a base coat to embed tape, intermediate coats to build coverage, and a final skim coat. Cutting corners leaves seams visible, especially under certain lighting.
Cracking at seams and corners happens when joint compound isn't properly applied or tape isn't securely adhered. Butt joints (non-tapered edges) are particularly vulnerable and require extra care, which poor quality drywall installation often skips.
Corner bead can fail if not properly secured or if compound is applied unevenly, leading to visible cracks as the wall settles.
Uneven Surfaces and Poor Sanding Quality
Uneven surfaces are easy to spot but diagnosing why requires understanding both installation and finishing failures. A properly installed wall should be flat and uniform. Ridges, depressions, waves, and visible transitions indicate improper installation or inadequate finishing.
Feel the surface with your palm in multiple directions. A well-finished wall should feel smooth and consistent. For precise assessment, use a straightedge or level placed horizontally and vertically in several locations. Gaps larger than 1/8 inch over a 10-foot span suggest sheets weren't installed flat or studs are out of plumb.
Installation-Level Failures
Poor quality drywall installation often causes unevenness before finishing begins. If sheets aren't secured tightly or fasteners aren't spaced correctly (12 inches on center for walls, 16 inches for ceilings), sheets can bow or shift. Professional installers shim studs or use additional fasteners to pull sheets tight; poor installers skip this step.
Another common failure is improper sheet seating. Screws must be driven flush, not protruding or countersunk too deep. Inconsistent screw depth across a sheet indicates poor quality drywall installation.
Finishing-Level Failures and Sanding Problems
Poor finishing creates unevenness even with a flat substrate. Joint compound requires a base coat to embed tape, intermediate coats to build coverage, and a final skim coat. Cutting corners leaves visible transitions and ridges.
Sanding is where many DIY repairs and rushed jobs fail. Careful sanding creates a smooth, uniform surface. Under-sanding leaves rough spots or visible transitions; over-aggressive sanding gouges compound or exposes tape. The goal is a surface that feels smooth and looks uniform under all lighting.
A critical but often-overlooked step is priming before painting. A quality primer seals the porous joint compound and provides a uniform base for paint. Without primer, paint adheres unevenly to compound, and imperfections become more visible. Poor quality drywall installation often skips primer or uses cheap paint that doesn't hide finishing flaws.
The Sound Test for Detecting Installation Problems
Tap along the wall with your knuckles at regular intervals (every 12-16 inches). A properly installed, well-finished wall produces a consistent, slightly hollow sound. Areas with poor adhesion, missing fasteners, or gaps between the sheet and studs create dull or dead spots, the sound is muffled or flat. These dead spots indicate the drywall isn't properly supported and may sag or fail over time. This tactile diagnostic method is faster than visual inspection alone and often reveals problems that aren't yet visible.
How to Fix Drywall Tape Bubbles and Blistering Paint
Bubbles in drywall tape and blistering paint are symptoms of poor quality drywall installation or improper finishing. These defects occur when tape isn't properly embedded in joint compound or when moisture gets trapped beneath the surface.
Drywall tape bubbles form when the tape wasn't pressed firmly into the base coat of compound. Small air pockets remain, and as the compound dries and shrinks, the tape lifts away from the surface. This creates visible bubbles that will eventually crack or tear.
To fix tape bubbles, you need to cut away the affected area, remove the damaged tape, and re-apply with proper technique. The base coat must be wet enough to allow the tape to embed fully, and firm pressure is essential as you apply it. Many DIY attempts fail because insufficient pressure is applied, allowing air pockets to remain.
Blistering paint is often caused by moisture problems beneath the surface or poor surface preparation. If drywall was installed in damp conditions or if moisture is present in the wall cavity, paint will blister as moisture vapor pushes through the coating. This points to potential structural issues beyond just poor finishing.
Fixing blistering requires identifying and addressing the moisture source first. If the problem is surface-level, inadequate primer or poor paint adhesion, scraping and repainting with proper primer solves it. If moisture is coming from behind the wall, the underlying issue must be corrected, or the problem will return.
Water Damage, Sagging, and Structural Concerns
Water damage is a serious indicator of poor quality drywall installation or ongoing moisture problems. Drywall absorbs water readily, and prolonged exposure leads to mold, structural degradation, and failure of the wall system.
Signs of water damage include discoloration, soft spots, peeling paint, and visible mold. These indicate that moisture has penetrated the drywall and is compromising its integrity. Poor quality drywall installation in bathrooms or kitchens, areas with high humidity, is particularly vulnerable if proper moisture barriers weren't installed.
Sagging ceilings or walls signal structural movement or settling that wasn't accommodated during installation. When drywall isn't properly secured or when fasteners fail, the weight of the material causes visible sag. This is both a cosmetic problem and a structural concern, as it indicates the drywall isn't being adequately supported.
Settling is normal in new construction, but poor quality drywall installation doesn't account for it. Proper installation includes slightly loose fasteners in certain areas to allow for seasonal wood movement. Fasteners that are too tight will pop as the frame settles; fasteners that are too loose create movement and noise.
Long-term structural implications of poor quality drywall installation include compromised fire ratings, reduced sound insulation, and weakened wall systems. If drywall is improperly installed in load-bearing walls or areas requiring specific fire-rating standards, the wall may not perform as intended in an emergency.
Cost to Repair Bad Drywall Installation and When to Call a Professional
Repair costs for poor quality drywall installation vary dramatically depending on the scope, severity, and underlying cause. Understanding the cost-benefit trade-off between DIY repair and professional work is essential for making the right decision.
DIY Repair: When It Makes Sense
Small, isolated defects are genuinely DIY-feasible if you have basic skills and patience. Nail pops, small tape bubbles, and hairline cracks in non-critical areas fall into this category.
Nail pop repair: Remove the popped fastener, install a new screw 2 inches above or below the original location, then cover with joint compound, sand, and paint. Materials cost: $5-$15. Time: 30-45 minutes per pop (plus drying time between coats).
Tape bubble repair: Cut away the affected area with a utility knife, remove the damaged tape, apply a fresh base coat of joint compound, re-embed new tape with firm pressure, apply intermediate and finish coats, sand, and paint. Materials cost: $10-$20.
Small cracks (hairline to 1/8 inch): Clean out loose material, apply joint compound with a putty knife, sand smooth, and paint. Materials cost: $5-$10. Time: 1-2 hours over 1-2 days.
The realistic constraint for DIY is not cost but time and skill. Each repair requires multiple coats with drying time between them.
Professional Repair: Cost and Scope
Professional drywall repair pricing typically falls into two categories: hourly labor and scope-based estimates.
Hourly rates for drywall finishing or repair generally range from $50-$100 per hour, depending on region and contractor experience. A professional can address multiple small defects (3-5 nail pops or small cracks) in 1-2 hours, costing $50-$200 total.
Scope-based estimates apply to larger repairs. Patching a 2×2 foot section of drywall (removing damaged material, installing new drywall, taping, finishing, and painting) typically costs $150-$400.
Water damage repairs are significantly more expensive because they often require removing drywall to address moisture sources, treat mold, and allow the wall cavity to dry.
Decision Framework: DIY vs. Professional
Use this framework to decide:
Choose DIY if:
- The defect is isolated (1-3 nail pops, one small crack, one tape bubble)
- The defect is cosmetic only (no water damage, no structural movement)
- You have time to allow multiple coats to dry between applications
- You're comfortable with basic hand tools and don't mind if the repair isn't perfect
- The total material cost is under $30
Choose Professional if:
- Multiple defects are present across a large area (more than 5 nail pops, widespread cracking)
- Water damage, mold, or soft spots are visible
- The wall is sagging or shows signs of structural movement
- Cracks are spreading or reappearing after previous repairs
- The defect is in a high-visibility area (living room, bedroom) where quality matters
- You lack experience with drywall finishing and want a guaranteed result
- The repair requires removing and reinstalling drywall sections
The Hidden Cost of Delaying Professional Assessment
One of the biggest mistakes homeowners make is attempting cosmetic repairs on walls with underlying structural or moisture problems. Covering a water stain with paint, for example, masks the problem while moisture continues to damage the wall cavity.
If you're uncertain about the cause of defects, whether they're purely cosmetic or symptomatic of a larger problem, professional assessment is the most cost-effective first step. A licensed contractor can determine the scope of work needed and recommend the most economical repair approach.
Frequently Asked Questions
How can you tell if a drywall job is bad?
Poor quality drywall installation shows multiple visible signs: nail pops protruding from the surface, visible seams even after finishing, uneven walls that don't feel smooth to the touch, cracking at corners or joints, and bubbling or peeling paint. Run your hand across the wall or shine a light at an angle to spot imperfections. Professional drywall finishing standards require smooth, invisible seams and properly set fasteners that stay flush with the surface.
What does a bad mudding job look like?
Bad drywall finishing appears as visible tape lines, uneven joint compound application, and rough texture that doesn't match the rest of the wall. Look for ridges, valleys, or hollow spots in the finished surface. Bubbling or blistering in the joint compound indicates poor adhesion or moisture issues. Seams should be completely invisible after proper taping and mudding, if you can see them, the work wasn't done to standard.
Can poor drywall installation cause cracks?
Yes. Poor installation causes cracks through several mechanisms: improper fastener spacing allows wallboard to move, inadequate corner bead installation fails under structural stress, and improperly taped joints crack as the building settles. Moisture damage from improper installation also weakens drywall and causes cracking. Structural movement combined with poor finishing creates stress points that develop visible cracks over time.
What is the cost to repair bad drywall installation?
Repair costs vary widely depending on the extent of damage and whether you hire a professional. Minor issues like nail pops or small bubbles in tape may cost less to fix, while extensive cracking, seam failure, or water damage repair is more expensive. Pricing depends on the square footage affected, materials needed, and labor. Contact a licensed contractor for an accurate quote on your specific situation.
Frequently asked questions
How can you tell if a drywall job is bad?
Poor quality drywall installation shows multiple visible signs: nail pops protruding from the surface, visible seams even after finishing, uneven walls that don't feel smooth to the touch, cracking at corners or joints, and bubbling or peeling paint. Run your hand across the wall or shine a light at an angle to spot imperfections. Professional drywall finishing standards require smooth, invisible seams and properly set fasteners that stay flush with the surface.
What does a bad mudding job look like?
Bad drywall finishing appears as visible tape lines, uneven joint compound application, and rough texture that doesn't match the rest of the wall. Look for ridges, valleys, or hollow spots in the finished surface. Bubbling or blistering in the joint compound indicates poor adhesion or moisture issues. Seams should be completely invisible after proper taping and mudding—if you can see them, the work wasn't done to standard.
Can poor drywall installation cause cracks?
Yes. Poor installation causes cracks through several mechanisms: improper fastener spacing allows wallboard to move, inadequate corner bead installation fails under structural stress, and improperly taped joints crack as the building settles. Moisture damage from improper installation also weakens drywall and causes cracking. Structural movement combined with poor finishing creates stress points that develop visible cracks over time.
What is the cost to repair bad drywall installation?
Repair costs vary widely depending on the extent of damage and whether you hire a professional. Minor issues like nail pops or small bubbles in tape may cost less to fix, while extensive cracking, seam failure, or water damage repair is more expensive. Pricing depends on the square footage affected, materials needed, and labor. Contact a licensed contractor for an accurate quote on your specific situation.